Showing posts with label holidays. Show all posts

Monday, June 7, 2021

Quilted Patriotic Star Pillow


patriotic quilted star pillow

Throw pillows are a quick and easy way to update your seasonal decor.  This one is perfect for the summer holidays - Memorial Day, Flag Day, 4th of July - but you could also make it with alternate colors for other holidays as well. It has four Sawtooth star blocks made from four fat quarters for the front (you could also easily use scraps for the stars) and finishes at around 18" square.  If you'd like to make one like mine, I'll link to the fabrics at the bottom of this post.  Here's how to make it:

MATERIALS NEEDED

Stars - (2) red fat quarters and (2) blue fat quarters (or scraps)

Background - 1/3 yd. cream or low volume print

Pillow back - gray fat quarter for solid pillow back OR 5/8 yd gray for envelope back

20" Square of fusible or thin batting

18" pillow insert or stuffing

10" design board (optional but helpful for piecing the stars)

CUTTING

From each red and blue fabric - 

Cut (1) 4.5" square

 Cut (8) 2.5" squares

From cream background fabric-

Cut (2) 2.5" x 20" strips and subcut into (16) 2.5" squares 

Cut (2) 4.5" x 20" strips and subcut into (16) 2.5" x 4 1/2" rectangles

Cut (2) 1.5" x 18.5" strips (not shown)

Cut (2)  1.5" x 16.5" strips (not shown)

lori holt fabrics for star pillow


MAKE STAR BLOCKS

For each star block:

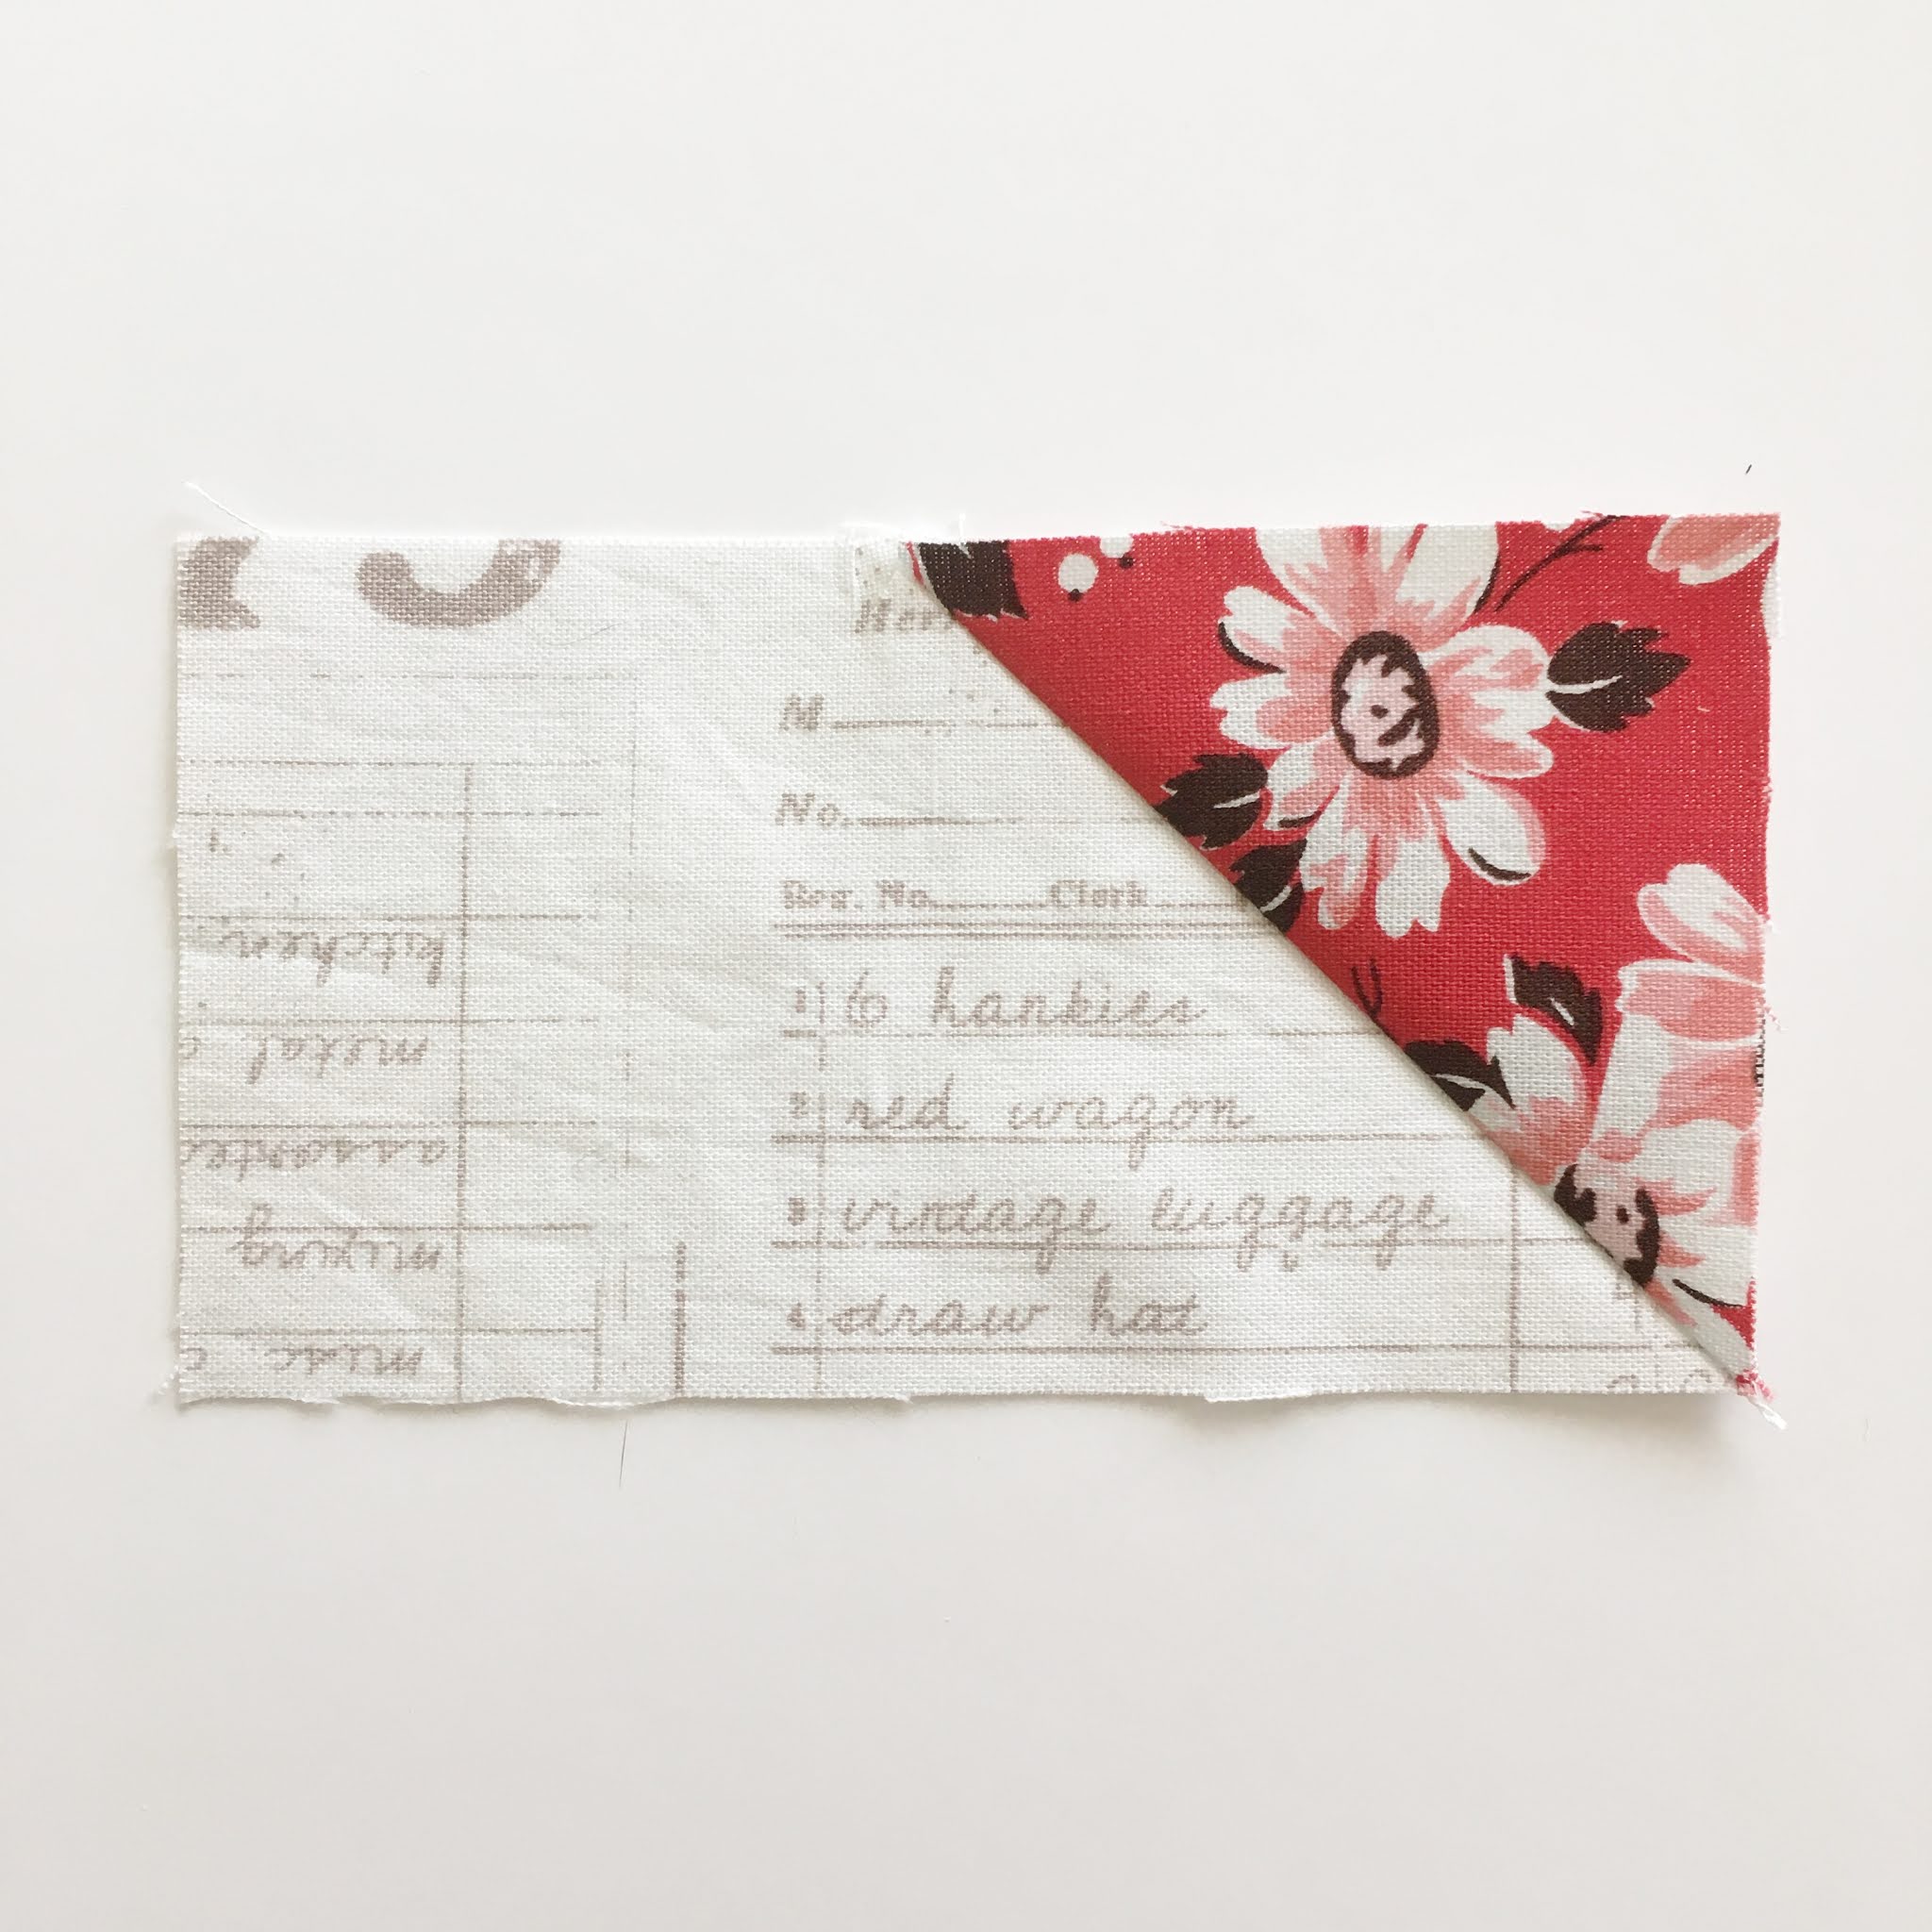
Points - Make four "Flying Geese" units using the sew-and-flip method as shown: 


flying geese unit for star block


flying geese unit for star block


flying geese unit for star block

flying geese unit for star block

back of flying geese unit for star

Layout block like this.

exploded star block

Sew left sides to middles.

exploded star block


Sew right sides to the middles.

exploded star block


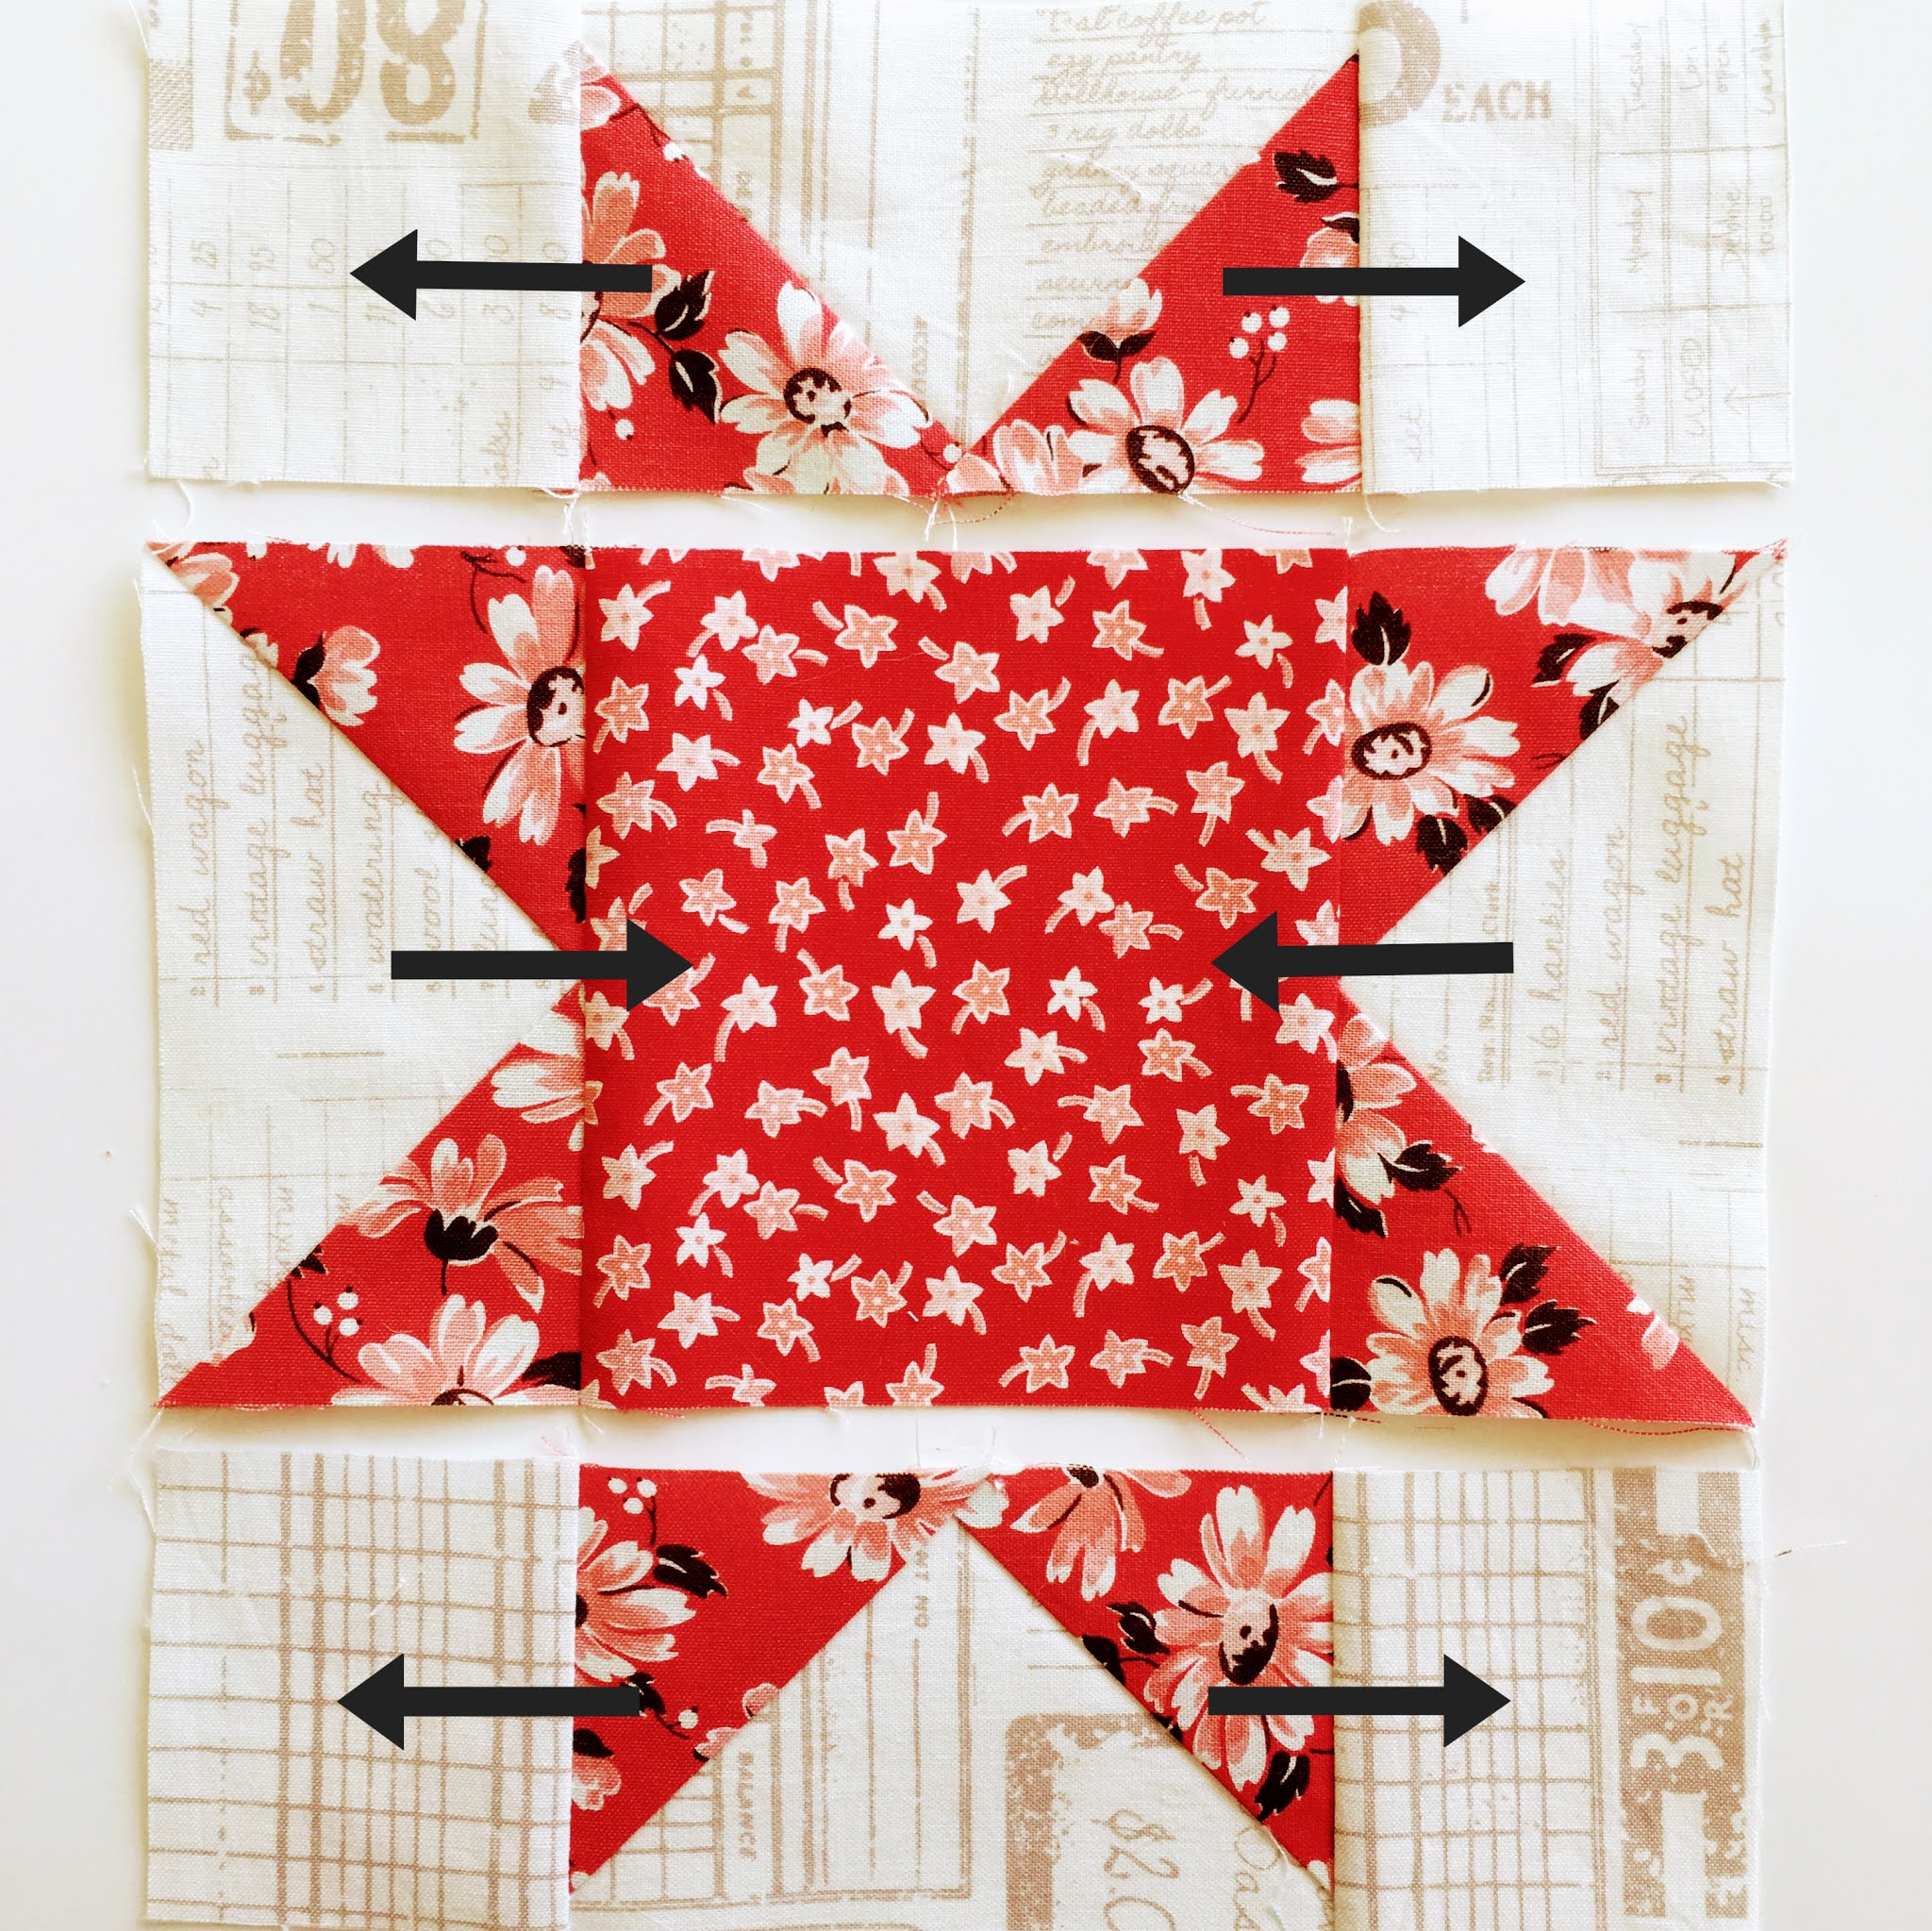
Press in the direction of the arrows.

pressing instructions for star block


Sew top, middle and bottom rows together, press seams open.

red sawtooth star quilt block

back of red sawtooth star quilt block


SEW PILLOW TOP TOGETHER

Sew blocks together, press, then sew 1.5" x 16.5" border strips on sides.  Press side strips outward, then sew 1.5" x 18.5" strips to top and bottom.  Press those outward.

patriotic star pillow top

patriotic star pillow top  

Fuse or baste your pillow front to your batting.  I didn't feel the need to add a backing layer because it wouldn't be seen and quilted just fine.  I quilted horizontal lines using a narrow stretch zigzag stitch approx. 3/4" apart.  

quilted patriotic star pillow top

quilted patriotic star pillow top closeup


Trim square (it will have "shrunk" a little to around 18-18.25" due to the quilting) 

For solid pillow back - from your pillow back fabric, cut a square the same size as the front, pin and sew around all four sides leaving a 12" opening at the bottom.  Turn right sides out, stuff with pillow form or stuffing and whipstitch closed.  

For envelope back - cut two pieces 24" x the width of your pillow (for example 24" x 18").  On each piece, fold one shorter side under 1" and press, then turn 1" again and press, and sew seam across the fold.

Place one of the pieces at the top of the pillow matching corners and raw edges (sewn edge will be toward the middle), pin in place.  

envelope back of star pillow


Place the other piece at the bottom of the pillow matching corners and raw edges (sewn edge toward the middle and overlapping the top piece).  Pin in place and sew all 4 outside seams. 

envelope back of star pillow

envelope back of star pillow


Turn right sides out and insert pillow form.  Here's how the back will look finished:  

envelope back of star pillow


patriotic star quilted pillow

Hope you enjoyed this tutorial and make one for yourself!  

As promised, here are links to the fabrics that I used:

Fat-quarter bundle for Stars and pillow back (if making solid pillow back)

Cream text fabric for background

Gray tulip fabric for envelope pillow back


Tuesday, October 4, 2016

Fabric Pumpkin Finish

Happy October!  In the desert southwest, we pretty much live for this time of year. 

The other day, I was putting out some fall decorations, and realized I didn't have any actual "pumpkin" decorations.  So I searched and found this tutorial and made one up.


 It was so easy and probably took less than an hour.   Here's what I used:
  • A 9" x 21" piece of orange floral fabric (half of a fat quarter works great)
  • Scraps of green dot fused together with Heat-n-Bond 
  • Craft stuffing, cream-colored crochet thread, piece of jute, 1/2" x 2" stick, cookie cutter for leaf shape, glue  
I just love it and plan on making more in other sizes.  A display with several would be fun.  

Finished size:  Approx. 6"W x 3 1/2"H (not inc. stem)  

Fabrics used in project are from the Fig Tree Farmhouse collection by Moda
 

Saturday, November 22, 2014

Autumn Table Topper Finish & Giveaway

Yesterday I finished up a new table topper for fall.  Yay!   


It measures 31" square.  I used one charm pack and a solid creamy white for the background.  I love the modern color palette and prints of this collection (Autumn Woods by Kate & Birdie/Moda).  I backed it with a soft yellow print and bound it with a medium yellow, so I could use it for other seasons (like spring).  I machine quilted it in a crosshatch design and finished the binding by machine too.


It was so easy to put together.  I used the Moda Love pattern; it's available as a free download at the Moda website.  It comes in sizes for mini charms (2.5" squares), charms (5" squares), and 10" squares.  I really want to make one up in the 10" square size; a red and white one would be fun for Christmas.

Would you like to win your own Autumn Woods charm pack?  Just leave me a comment telling me what you'd make with it.  Winner will be chosen on Monday the 24th (yes, this Monday!) at 9pm PST.     (Sorry, due to higher int'l shipping costs, giveaway open only to those in the US.)


My "helper" - Snickers
Come see me on Instagram!

Linking to:  Crazy Mom Quilts Finish It Up Friday
                     Sunny Simple Life Simple Saturdays Blog Hop 
                     Sew Many Ways Sew Darn Crafty 

Wednesday, October 22, 2014

Great Pumpkin Quilt Finish


(Warning - lots of orange in this post)  Happy October!  Well, what's left of it.  I have a quilt finish to share today - yay!  It's a small lap size - 40" x 50" - perfect for my grandkiddos. 

(Sorry about the shady pic)
It's made with a Peanuts Halloween print which was too cute to cut up.  You can read more about the fabric and pattern here.  I backed it with a Riley Blake medium chevron in black and white, and machine-bound it in a solid black. 

 
I free-motion quilted the large open areas with my favorite wavy lines in orange thread, and echo-quilted in the black squares with black. 


Snickers approves.  


I also made this little potholder (or maybe snack mat?), while at our guild retreat last month.  I just took an orphan block, sandwiched it, quilted it with an elongated zigzag stitch, and bound it.  Fun little project.


Speaking of our annual guild retreat, I won this table topper a couple of years ago when the theme was Halloween.


Happy Halloween!


I love pumpkins.
Linking to:  Sew Many Ways Sew Darn Crafty
                  Quilt Story Fabric Tuesday
                  Pretty Bobbins I Quilt 
                  My Quilt Infatuation Needle and Thread Thursday

Tuesday, July 15, 2014

Summer Sewing

With summer in full swing, there hasn't been much time for sewing (or blogging) lately.  Knowing that, I decided to go ahead and start a little project anyway.  It was super quick (a few hours), and turned out rather cute, I think.  


A close-up of the main fabric and the pattern used:

Welcome Great Pumpkin by Quilting Treasures
 
Love Villa Rosa patterns

Given that the pattern had a retro feel, and that the "It's The Great Pumpkin, Charlie Brown" holiday special was first shown in 1966, they seemed to go together nicely.  I think I'll back it with a black and white chevron, and machine-quilt it with vertical squiggly lines (my favorite quick quilting technique) using gray thread.  Not sure what to bind it with - maybe black?  The top finished at 40" x 51". 

I hope summer is going well where you are.  It's always a really busy (and hot!) season around here.  Thank goodness we've had overcast days, which helps keep the 110's at bay.    


Come see me on Instagram @farmroadquilts

Linking to:  Fabric Tuesday
                  WIP Wednesday
                  Finish It Up Friday 

Wednesday, May 14, 2014

Notebook Covers

I wanted to make some gifts for Mother's Day, and since we like to keep it simple, I chose these notebook covers.


I used Lori Holt's tutorial that she did for AllPeopleQuilt.com. The covers came together quickly and turned out great.  Each has a small pocket on the front for pens and pencils, and two large pockets on the inside covers for notes and such, and fits an inexpensive standard spiral notebook. 


After the cutting was done, each took about 1 to 1 1/2 hours to complete.  Later, I found some cute coordinating pens at Walmart and put one in each notebook (no pic of those).  And of course, I made one for myself, because I'm a mom too.  : )  I used some adorable Pam Kitty fabric for mine.


I think I'll keep sewing & quilting notes in it.  Like my long list of works-in-progress.


Follow me on Instagram
Fabrics available here 

Linking to:  Sew Many Ways - Sew Darn Crafty 
             Quilt Story - Fabric Tuesday 

Thursday, April 24, 2014

Sew and Tell


After getting my heart quilt finished (yay!), I decided to turn my attention to this little quilt.  Since it isn't very big ( 46" x 56"), I thought I would try basting it on a large section of my kitchen counter.  I used tape and some large clamps to secure the backing, and pin-basted 1/2 at a time.  It worked pretty well!  

So, last night I started in on quilting it.  I decided to quilt curvy lines in the squares, and am doing all the white areas first. 


I really like how it's looking, and am wondering if I'll even need to quilt in the colored squares.  We'll have to see.  I plan on echo-quilting around the applique, and doing some quilting inside the flowers and leaves.

In between the heart quilt and the Posie Patch, I had a little sew-in one afternoon with some quilt-y friends (you'll remember them from the quilt show).  Pam brought us some mini quilts she had just finished up:


Aren't they the cutest!  Now I'm thinking of making one (or some).  She was finishing up the binding on this one:


Sorry, it's hard to see the colors in the photo, but it I would call it a low volume 16-patch quilt.  She made it to fit her picnic table.  Don't know if I'd want to eat on it.  : )   Pam is leaving us next month to spend the summer in Wisconsin, but she'll be back in the fall.  Hopefully she'll come back with more show-n-tell.

Linda made us the cutest little closeable fabric baskets, just perfect as thread catchers.  You can see it at my Instagram (sorry, I couldn't get the pic to show up here). 

I worked on my Happy Pinwheels quilt, and finished it up that evening. I'll start quilting on it after I'm done working on my Posie Patch quilt.


Hope you all had a happy Easter.  We had lots of family over, including these little cuties who are waiting for the egg hunt:


Despite her size, the little one in the middle gathered the most eggs; no head start for her next year.  : )